This is a video I made of all the windows versions from Windows 1.0 to the soon to be Windows 7 or Windows Vienna. Please comment. Enjoy!
Showing posts with label Windows Tips. Show all posts
Showing posts with label Windows Tips. Show all posts
ALL Microsoft Windows Versions...
ALL MICROSOFT WINDOWS VERSIONS
All Microsoft Windows Versions From Windows 1.0 To Windows Vista (NO STARTUP SOUNDS)
AMD64 Technology Meets the Windows x64
AMD is behind on its 65nm transition. By year end, "everything AMD produces will be on 65nm technology".
AMD64 Technology Meets the Windows x64
Virtual Machine: Installing Windows 2003
Windows 2003 on a virtual machine created with VMware ESX 3.0 (released today). This is on an 8 processor AMD64 server from Sun Microsystems.
MS-DOS on Windows 2000-2003-XP-Vista
Windows XP ha segnato, anche per l'utenza comune, la fine degli stretti legami prima di allora presenti tra OS in interfaccia grafica (Windows appunto) e DOS. I motivi sono oramai noti, per cui non mi dilungo in ulteriori spiegazioni. In sintesi, si &egra
Windows Server 2008 Enterprise
Does it look like Vista is booting up until the logon screen? Sorry for the long pause in between the booting bar and the logon screen
Windows Server 2008 Enterprise
Windows Longhorn Serveur
Demonstration des nouvelles fonctionnalitées de Windows Longhorn Server. Terminal server nouveau nom windows serveur 2008
Windows Longhorn Serveur
Top 5 Tips for Migrating from Windows to Linux
We get questions every day from people wondering about how to switch to Linux. What do they need to know? What should they get? One of our Lockergnome bloggers came up with an excellent starting point.
Top 5 Tips for Migrating from Windows to Linux
How is OS X Different than Windows?
Windows works differently than OS X - and it's no wonder that Windows-trained users face a small amount of frustration when they work inside of OS.
How is OS X Different than Windows?
» Windows XP - Getting the Correct Time
ALL computers need to know the time. Many applications, from sending an email to storing information are reliant on the PC knowing when the event took place. In some environments timing is even more crucial where a single second can make all the difference between profit and loss - just think of the stock exchange.
Most computers have internal clocks which are battery backed, so the computer can still keep time when the machine is off. However, are these clocks really that reliable? The answer of course is no.
Computers are mass marketed and designed for multi functions, timing not being that high on the manufacturer's agenda. The internal clocks (called RTC real time chips) are normally adequate for home computing or when workstations run alone. However, when computers run in a network, then a lack of synchronization can cause problems.
It may be a minor thing such as an email arriving somewhere before it was sent (according to a PC clock) but with some time sensitive transactions and applications, a lack of synchronisation can cause imaginable problems: Imagine turning up at an airport only to find the airline seat you had bought weeks before was in fact sold to somebody else afterwards as their booking agent had a slower clock on their computer!
To get around these problems most computers on a network are synchronised to a single time source using NTP (network time protocol) this time source can be either relative (a computer's clock or wrist watch) or an absolute time source like UTC.
UTC (Coordinated Universal Time) was developed after the emergence of atomic clocks and is a standard time scale used globally, allowing machines all over the world to use a single time source.
Windows XP can easily set the system clock to use UTC by accessing an Internet source for UTC (either: time.windows.com or time.nist.gov). To achieve this, a user merely has to double click the clock on their desktop and adjust the settings in the Internet Time tab.
However, Microsoft and other operating system manufacturers strongly advise that external timing references should be used as Internet sources can't be authenticated, making systems vulnerable to a malicious attack.
If you wish to run a network time server Windows XP, then specialist NTP servers are available that can receive a time reference via the GPS satellite system or specialist national transmissions
To allow Windows XP to operate as a network time server, the NTP service needs to be switched on. To activate NTP simply find the following subkey in the registry editor (regedit):
HKEY_LOCAL_MACHINE\SYSTEM\CurrentControlSet\Services\W32Time\TimeProviders\NtpServer\
Right click enabled (in the right-hand window) then Modify. Edit the DWORD Value and type 1. Right-click NtpServer, then Modify and in the Edit DWORD Value under Value Data type Peers, then click OK.
Exit the registry and start windows time service by clicking Start/Run and typing:
net stop w32time && net start w32time.; Then on each computer on the network (other than the domain controller which can't be synchronised with itself) type: W32tm/resync/rediscover.
Copyright 2008 © Richard N Williams
Richard N Williams is a technical author and a specialist in the telecommunications and network time synchronisation industry helping to develop dedicated time server products; ethernet clocks, GPS time servers, NTP servers, digital wall clocks, atomic clock servers and SNTP time servers. Please visit us for more information about NTP products and NTP servers.
This article may be republished and reprinted in its complete form or in part without seeking permission providing a relevant link to this site is maintained. It is a violation of copyright law to reprint or publish this content without following these terms.
Article Source: http://EzineArticles.com/?expert=Richard_N_Williams
» 7 Registry Tweaks to Enhance the Performance of Windows XP
The registry is a critical component of your Windows system because it is a central database of applications and hardware installed on your system.
The registry is primarily comprised of five registry keys: HKEY_CLASSES_ROOT, HKEY-CURRENT_USER, HKEY_LOCAL_MACHINE, HKEY_USERS, and HKEY_CURRENT_CONFIG. All your user preferences, and software and hardware configuration information is stored in these registry keys.
When you install your Windows XP system, the installation process adds some default configuration settings in the registry. These registry settings control the way your operating system behaves and responds to your commands.
Due to the critical nature of the registry, Microsoft recommends that users refrain from making any manual changes to the registry. However, if you are careful and make a backup of the registry before going ahead with the changes, there are certain registry tweaks that you can perform to make your Windows XP operating system behave the way you want it to and even improve its performance.
Note: In order to implement registry tweaks, you need to open the Registry Editor tool by running the “regedit” command.
1.) Reduce the System Shutdown Time
When you hit the Turn Off button, a message is sent to all programs running on your XP system to shutdown. The default time to allow applications to shutdown is 20 seconds. To reduce this time to say 5 seconds, in the Registry Editor navigate to the following registry key:
HKEY_CURRENT_USER\Control Panel\Desktop
Here, double-click on the value “WaitToKillAppTime” and change its default value 20000 to 5000 and select the OK button.

2.) Faster Menus
To improve the responsiveness of the drop-down menus, navigate to the following key:
HKEY_CURRENT_USER/Control Panel/Desktop
Here, double-click on the value “MenuShowDelay” and change its value data to “0”.

3.) Disable CD AutoPlay
To prevent your CDs from playing automatically when you insert them in the CD-drive, navigate to the following location in the registry editor:
HKEY_LOCAL_MACHINE\SYSTEM\CurrentControlSet\Services\Cdrom
Here, double-click on the value “Autorun” and change its value data to 0.

4.) Disable startup programs
Programs that load during system startup unnecessarily eat up a lot of system resources and slow down your computer. To disable these startup programs, first open each of the following keys listed below one-by-one.
HKEY_LOCAL_MACHINE\SOFTWARE\Microsoft\Windows\CurrentVersion\Run
HKEY_LOCAL_MACHINE\SOFTWARE\Microsoft\Windows\CurrentVersion\RunOnce
HKEY_CURRENT_USER\SOFTWARE\Microsoft\Windows\CurrentVersion\Run
HKEY_CURRENT_USER\SOFTWARE\Microsoft\Windows\CurrentVersion\RunOnce
Go through the list of programs added here and remove the programs that you don’t want to load at startup.
Note: Each of these keys comprises the list of programs that load at startup. Entries in the HKEY_CURRENT_USER key apply only to the current user while entries in the HKEY_LOCAL_MACHINE key are for all users.
5.) Reduce the Time for Windows Reporting an Application as Not Responding
To reduce the reporting time for Not Responding programs, open the following registry key:
HKEY_CURRENT_USER\Control Panel\Desktop
Here, double-click on the string value “HungAppTimeout” and change the default value from 5000 milliseconds (5 seconds) to a smaller value say 1000 (1 second).

6.) Reduce the waiting time for Chkdsk to check your drive at system startup
To reduce the time for Chkdsk to check your drive at startup, navigate to the following key:
HKEY_LOCAL_MACHINE\SYSTEM\CurrentControlSet\Control\Session Manager
Here, open or create the DWORD value, AutoChkTimeOut and set the number of seconds (in milliseconds) you want Chkdsk to wait before scanning your hard disk during Windows startup.

7.) Hide Desktop Icons
To ensure that your beautiful wallpaper is not speckled by icons, navigate to the following key:
HKEY_CURRENT_USER\Software\Microsoft\Windows\CurrentVersion\Policies\Explorer
Right-click on the right pane, select Binary Value and name it as “NoDesktop” and change its value data to 01 00 00 00.

Registry tweaks can help you customize your XP computer and even enhance the performance of your system. While working within the registry, you must also keep in mind that registry cleaning is also very important in order to maintain an error-free, healthy system. You can clean and remove registry errors with the help of registry cleaner tools and ensure yourself a healthy registry and enhanced system performance.
» Automatically Connect To Folder Shares During Logon In Windows
For many Computer users, having a Network in their home is becoming common thanks to the simplicity and low cost of setting up a Wireless Network (no more running CAT 5 cables through your walls and floors…yeaa!!).
With this convenience, comes many advantages such as sharing files and folders between Computers. But browsing or manually connecting to all those shares can be a hassle, especially if they are password protected.
Instead, you can easily setup connecting to shares automatically when logging on to your Windows computer.
To have Windows automatically connect to shares on your Network, we'll need to create a drive mapping (or several if you connect to more than one share).
Drive mappings are great for shares that are password protected since you can setup them up to authenticate automatically.
Start by double clicking on My Computer (XP), or Computer (Vista). Then click on Tools from the menu and select Map Network Drive…
NOTE: Screen shots are from XP and will look similar with Vista.

If you know the Computer and Share name, just enter it in the Folder: field using the following format:
\\computername\sharename
Or you can browse for the Computer by clicking on the Browse… button.
To automatically connect during logon, check the box next to Reconnect at logon.

If you want to use a specific letter to map the drive (other than the one selected by default), click on the arrow next to the Drive: field and make your selection.
NOTE: any existing drive mappings in use, will not appear in the drop down list.

For shares that are protected with a password, click on the link in the phrase Connect using a different name.

In the Connect As… dialog box, enter the username and password of the remote computer. Make sure you append the Computer name before the username as shown in the screen shot below.

Click OK when finished.
When you have completed all the steps, click Finish. to connect and map the drive.
Next time you boot your Computer or logon, the share will automatically connect and create the drive mapping. No need to keep authenticating
To view the share, open My Computer (XP) or Computer (Vista).

TIP: You can also create a shortcut to the drive mapping on your Desktop. When the Create shortcut wizard runs, select the Browse button and expand Computer then select the drive letter.
If you no longer need to map the drive, just right click on the drive letter and select Disconnect.
Using drive mappings is not restricted to just Windows Computers, you can create mappings to any Linux Computer (running Samba) also.
For shares that are not password protected, it's not necessary to create a drive mapping, since you can just create a shortcut to the share on your desktop. But it can be useful if you run scripts or have programs and applications that need to access the share. Also you won't need to browse the Network anymore if you don't use shortcuts.» Browse Folders From The Run Command In Windows
Creating shortcuts to folders is a fast and easy way to access files or folders on your Computer when running any version of Windows. But how many shortcuts do you really want cluttering up your desktop? I usually create folder shortcuts to my most accessed folders, which helps keeps my desktop organized. But sometimes, you still end of with a bunch of shortcuts. Instead, you can browse and open folders using the run command.
Start by clicking on Start \ Run… to bring up the run dialog box. Next type c:\ (or whatever drive letter of the folder you are looking for).
NOTE: screen shots are from Windows XP, but will be similar in Vista.

As soon as you start typing, Windows will display the folders of the path you have typed in the run field. To navigate, either use the scroll bar or the Up / Down arrow keys.
You can also type the first few letters of a folder your are looking for, or just type one letter to display all folders that begin with that letter. For example, after browsing to c:\program files then typing the letter i , all folders starting with i will be displayed.

When you find the folder you are looking for, scroll down or use the Up \ Down arrow keys, highlight it, and press enter to open a new window. Or, type a backslash \ to continue browsing into the folder.
You are not limited to just browsing and opening folders, you can also browse to files and open them using the same steps as above, or you can access and browse network shares from the run command.
» Create Customize Shortcut For Running Windows Disk Cleanup
Windows Disk Cleanup utility is a great tool for cleaning up multiple locations on your Vista or XP Computers. The one drawback to the utility is that you need to configure it every time you want to cleanup your disk drives.
Instead, you can easily pre-configure specific tasks for Disk Cleanup to use and create a shortcut on the Desktop to run it at any time.
In order to create a customize configuration for Disk Cleanup, we need to run the utility using the sageset option. This option allows you to configure the Cleanup utility, and save it, so we can run it later with the custom configuration.
To get started, open the Run window by clicking on Start \ Run… and type:
cleanmgr.exe /d c: /sageset:1
Where:
cleannmgr.exe = executable for Disk Cleanup utility.
/d c: = is the drive letter we want to use, and since it contains the Windows installation, will have all available options. (NOTE: see more information below about multiple drives)
/sageset:1 = used to create the registry key for storing the configuration.
NOTE: Following screen shots are from Vista Disk Cleanup Utility. XP cleanup will look similar but with less options.

Now make any selections by checking each item you want to cleanup. When finished, click OK.
Next, go to your Desktop, right click and select New \ Shortcut. Then enter the following command in the "Type the location of the item:"
cleanmgr /sagerun:1

Click next and give the shortcut a name, such as "Quick Clean Up" (do not use quotes). Now when you want to run the customized configuration for Disk Cleanup, you can just double click on the shortcut.
If you are wondering, the /sagerun:1 option tells Disk Cleanup which configuration to use. So that means you can create different configurations (such as cleanup the trash, or cleanup temp and setup log files) by specifying the number with the /sagerun variable.
But I Have Multiple Drives?
Unfortunantly, when Disk Cleanup runs, all drives are cleaned (regardless of the number of drives you have) with each run. While you cannot choose which drive to clean, specifing the drive letter when creating a configuration allows you to choose only the options that are available on that drive.
For example, if you have an E:\ drive, use:
cleanmgr.exe /d E: /sageset:2
and configure the tasks for Disk Cleanup to use on the E:\ drive. Options that only pertain to that drive should only be available.
Even though the custom configuration will also clean the same selections on the C:\ drive, you can tailor the configuration to only what is available on the E:\ without just selecting everything.
When finished, you can either create another shortcut on your Desktop using the following command:
cleanmgr /sagerun:2
Or create one shortcut to run both cleanup tasks which will basically combine the selections into one automatic cleanup.
cleanmgr /sagerun:1 /sagerun:2
Now you can cleanup your Computer with custom configurations set to your preferences automatically.
» Create Shortcuts For Restart Shut Down Or Logoff On Windows XP and Vista
A few ways exist to restart, shutdown, or log off your Windows XP and Vista computer. The most popular methods used are the Start Menu or the famous Ctrl-Alt-Del. Sometimes you may want to quickly click on a shortcut or create a keyboard shortcut that will accomplish the task. If so, here's a quick way to create those shortcuts to execute either restart, shutdown or hibernate.
Windows XP and Vista, include the built-in command shutdown.exe that will restart, shutdown and log off (Vista shutdown command includes the option to hibernate) your Computer. The shutdown command is also available for Windows 2000 and 2003 servers.
The basic options for shutdown.exe for both XP and Vista are:
- -l Log off
- -s Shutdown the computer
- -r Shutdown and restart the computer
- -t xx Set timeout for shutdown to xx seconds
On Vista (only) the hibernate option is
- /h Hibernate the local computer.
To create a shortcut to shutdown your Computer, right click on the Desktop (or where you want to create a shortcut), and select New \ Shortcut. In the Type the location of the item text field enter:
%SystemRoot%\System32\shutdown.exe /s
NOTE: following screen shots are from Vista. Windows XP Create Shortcuts wizard will look a little different but the steps are the same. The %SystemRoot% is a System variable for C:\Windows folder.
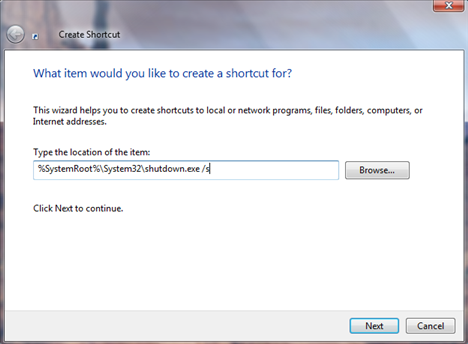
Then click next to continue and give the shortcut a name and click Finish.
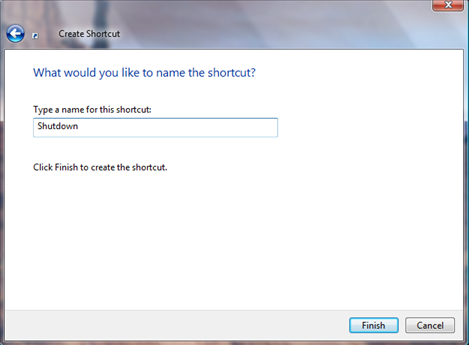
If you want to delay the time for restart, shutdown, log off, or hibernate (Vista only), you can use the -t switch to set a timeout delay for the command to execute. In the example above, adding timeout to the command for 10 seconds would look like this:
%SystemRoot%\System32\shutdown.exe -t 10 /s
If you prefer to use the the keyboard, you can easily add a keyboard shortcut to the new shortcut by following the steps outlined in the article Create Keyboard Shortcuts on Windows.» Customize Windows Command Prompt To Look Like A Bash Shell Prompt
I use both Linux and Windows Computers at work and have a need to use the command prompt on Windows. By default, Windows command prompt displays the current directory path. One problem with this is when you switch to a directory that has a long name, the prompt can end up half way across the screen. How can I change the prompt to look like a Bash shell prompt?
That is one drawback with Windows command prompt when the directory path name is long, the prompt ends up half way across the screen:
C:\Program Files\Microsoft Visual Studio\Common\IDE\IDE98>
With such a moving target that the command prompt can be at times, it can also be changed very easily by using the Prompt command.
The syntax for the Prompt command follows:
PROMPT [text]
where text specifies a new command prompt that can be made up of System and User variables, normal characters and the following special codes:
- $A & (Ampersand)
- $B | (pipe)
- $C ( (Left parenthesis)
- $D Current date
- $E Escape code (ASCII code 27)
- $F ) (Right parenthesis)
- $G > (greater-than sign)
- $H Backspace (erases previous character)
- $L < (less-than sign)
- $N Current driveprompt [%USERNAME%@%COMPUTERNAME%$S~]$$
- $P Current drive and path
- $Q = (equal sign)
- $S (space)
- $T Current time
- $V Windows XP version number
- $_ Carriage return and linefeed
- $$ $ (dollar sign)
Say you wanted to make the prompt look like a Bash prompt on Ubuntu, Open a command prompt (go to Start \ Run… and type cmd then click OK) and enter the following Prompt command syntax:
prompt %USERNAME%@%COMPUTERNAME%:~$$$S

Or you want the Prompt to look like a Bash prompt on Redhat Fedora:
prompt [%USERNAME%@%COMPUTERNAME%$S~]$$

If you wanted to return the Prompt back to the default setting, just enter:
Prompt $P$G
When changing the prompt at the command line, it is only valid during the session. Once you exit or quit the prompt will return to its default value. To make the change permanent, you will need to make a Registry change.
Before Proceeding - the next step includes exporting the registry key to use as a backup if needed. DO NOT SKIP THIS STEP. As a safe guard, you may want to create a System Restore point when making configuration changes to your System.
- Open regedit
- Navigate to HKEY_LOCAL_MACHINE\SYSTEM\CurrentControlSet\Control\Session Manager\Environment
- Right click on Environment and select Export to back up the Key to a location on your Computer (you may also want to copy to a CD or USB drive that can be accessed if needed)
- In the right Window Pane, right click and select New \ String Value and name it PROMPT
- Double click on Prompt and in the Value data: field type the syntax for the Command Prompt you wan to use (for example - [%USERNAME%@%COMPUTERNAME%$S~]$$)
- Close regedit and either logoff or reboot
The next time you open the Command Prompt, you new prompt will always be set.
» Find Location Of Mouse Pointer Using CTRL Key In Windows
For many Windows power users, their typical desktop can be a busy display of multiple open applications with cascading window sizes that leaves no desktop real estate untouched. Fortunately finding and bringing applications to the front is easy using the ALT + Tab keyboard shortcut. But sometimes finding the mouse pointer is not so easy. Instead of moving the mouse around as fast as you can to find the pointer, a simple configuration setting will allow you to use the CTRL key to find the pointer.
To configure using the CTRL key, on any version of Windows (98, ME, XP, Vista and Windows server versions), open
Control Panel \ Mouse.
In the Mouse Properties window, select the Pointer Options tab, and in the Visibility section, check the box next to Show location of pointer when I press the CTRL key.
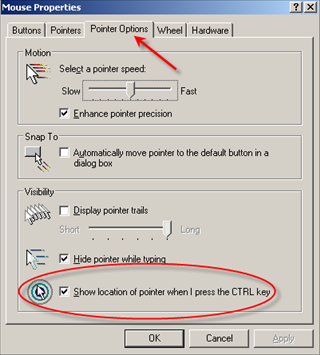
Next time you have lost focus on the mouse pointer, just press the CTRL key on your keyboard and the pointer will be outlined in a decreasing wave of circles around the mouse pointer.

This setting becomes very useful while editing documents or forms if you also checked the Hide pointer while typing option in the Pointer Options tab of the Mouse Properties.
» Fix Windows XP Autoplay Problems With AutoPlay Repair Wizard
Autoplay in Windows XP can be a convenient feature when inserting a CD, DVD or portable USB drive. But it can also be frustrating when autoplay develops a problem and things don't work the way you want them to….or when you don't want them to work.
While Vista has an autoplay settings interface found in the control panel, XP buries auto play settings in the properties option of each device.

If making changes in the autoplay tab, for a device that is not working properly fails, and you have exhausted all other options, a little known tool is available from Microsoft called AutoPlay Repair Wizard may be able to help.
AutoPlay Repair Wizard (APRW) scans your computer devices to find defective AutoPlay settings, and attempts to fix those it finds.
AutoPlay Repair Wizard requires NO installation and is a stand alone utility. To run it, just double click on AutoFix.exe.
After starting the wizard and clicking the Next button on the introduction screen, APRW runs a global check that verifies if the Shell Detection service is running and set to auto start.

If neither of the checks are configured properly, you can click on the Repair button (next to the failed option) to fix the problem.
Clicking Next takes you to the screen where you can select the drive where Autoplay is not working.

After selecting a drive and clicking Next, APRW will check for any problems with Current, User, or Device Diver policies. If any problems are found you can attempt to fix them by clicking on the Repair button.

If no problems are found, click on Next, and following the instructions, try to re-produce the problem you are having so APRW can monitor in real time.
For example, if you are having a problem with autoplay with your CD drive, insert a CD and click on Begin Test.

You will notice the wizard will refer to the event as "AutoPlay V2 event". Pre-Windows XP Autoplay is referred to as Autoplay V1 (Win 95/98/ME). Autoplay V2 refers to the new Autoplay features introduced in Windows XP. Not sure why Microsoft decide to display the version, since AutoPlay Wizard only runs on XP and 2003, but you can ignore it.
If any problems are found, you will have the opportunity to repair the problem. If the wizard is successful or not, click on Next to go to the next screen where you can view a log displaying all the checks and their results.

While Autoplay Repair Wizard may not fix all problems, it is worth a shot when your down to your last option and everything else fails.
Just like the tool I wrote about to fix Windows XP TCP Network problems, utilities like these found in Microsoft archives, sometimes proved to be life savers to you and your Computer.
» Fixing Windows XP Device Manager Errors
Every now and then it's going to happen, you install a new piece of hardware in your Computer, boot up Windows XP and something goes wrong with plug an play while adding the hardware. So you put on your troubleshooting hat, stare at the error message that usually does not make sense, and decide it's time to take a look in XP's Device Manager for clues.
Hopefully it's an easy fix…
More often than not that scenario occurs when you have no time and you are anxious to use that shiny new hardware such as an iPod, MP3 player or Wireless Network card. While some error messages may be an easy fix, Device Manager often points out the failed device but with a cryptic description of the problem.
To help with the error code description, Microsoft article, Explanation of error codes generated by Device Manager in Microsoft Windows XP Professional is a good source that provides more information of the codes. While the description may not completely solve your problem, I have found it to be a good starting point that eventually led me to resolving issues with hardware problems.
Below lists an explanation of the symbols that indicates the type of problem and is usually present with failed device:
- A black exclamation point ("!" on a yellow field indicates the device is in a problem state. Note that a device that is in a problem state can be functioning.
- A yellow exclamation point indicates the device is not configured correctly.
- A red "X" indicates a disabled device. A disabled device is a device that is physically present in the computer and is consuming resources, but does not have a protected-mode driver loaded.
- A blue "i" on a white field on a device resource in Computer properties indicates that the Use automatic settings feature is not selected for the device and that the resource was manually selected. Note that this does not indicate a problem or disabled state.
- A Yellow question mark "?" indicates Windows was unable to locate the drivers for the device and cannot determine the type of device being installed (usually listed under Other devices category).
Many times hardware problems are caused by the driver that was loaded and can be resolved by updating the driver with the latest version. Other issues may be caused by resource problems such as memory and IRQ conflicts.
To view memory and IRQ allocations for devices, open Device Manager by clicking on Start \ Run and type devmgmt.msc in the run box.
Then select Resources by connections.

From here you can expand Interrupt request (IRQ) and Memory to view the resource allocations.

Some sound cards and video adapters do not report all of the resources that they use in Windows. This can cause Device Manager to show only one device in conflict, or no conflicts at all. This can be verified by disabling the sound card, or by using the standard VGA video driver to see if the conflict is resolved.
While there is no "magic wand" that can be used to resolve hardware problems, Device Manager does show you the big picture of what is installed and the status of devices on your Computer.
Once you have identified the problem, the best solution is to visit the hardware manufacturer web site for updates and check their knowledge base for information or contact them for technical support.
Subscribe to:
Posts (Atom)


 Posts
Posts


